Proxmox mini-how-to
Proxmox is a great virtualization solution that is far superior to Linux KVM and a fantastic replacement for the very limited and mostly defunct VMWare free edition.
Setting up proxmox
Prepare media
Download the ISO of the community edition and use your favorite tool to write that to a bootable USB stick. Personally, I use BalenaEtcher as it does the job and is very easy to use.
Prepare DNS
It is best to configure any DNS entries for the host in advance: pick an IP and host name that work for your network and add it to your DNS servers. Flush/refresh your DNS across your DNS servers.
Install Proxmox
Plug in your hardware and plug in a network cable. Boot off the USB stick on your new soon-to-be proxmox server. Follow the prompts, set up networking, and let it run. Be sure to remove the USB stick when prompted prior to the final reboot.
Configure Proxmox
There is not a lot of configuration necessary, but they are critical and/or helpful:
Networking
Configure a bonded interface (LACP) if you have multiple interfaces and your switch supports it. I configured two ports on my switch in trunked mode as LACP (802.3ad) and then configured proxmox’s /etc/network/interfaces file to look something like this:
cat interfaces
auto lo
iface lo inet loopback
iface enp1s0 inet manual
auto vmbr0
iface vmbr0 inet static
address my.internal.ip.address/24
gateway my.internal.ip.gateway
bridge-ports bond0
bridge-stp off
bridge-fd 0
iface enp2s0 inet manual
auto bond0
iface bond0 inet manual
bond-slaves enp1s0 enp2s0
bond-miimon 100
bond-mode 802.3ad
bond-xmit-hash-policy layer2+3
iface wlp3s0 inet manual
source /etc/network/interfaces.d/*
And reboot. Now you can plug in the second cable.
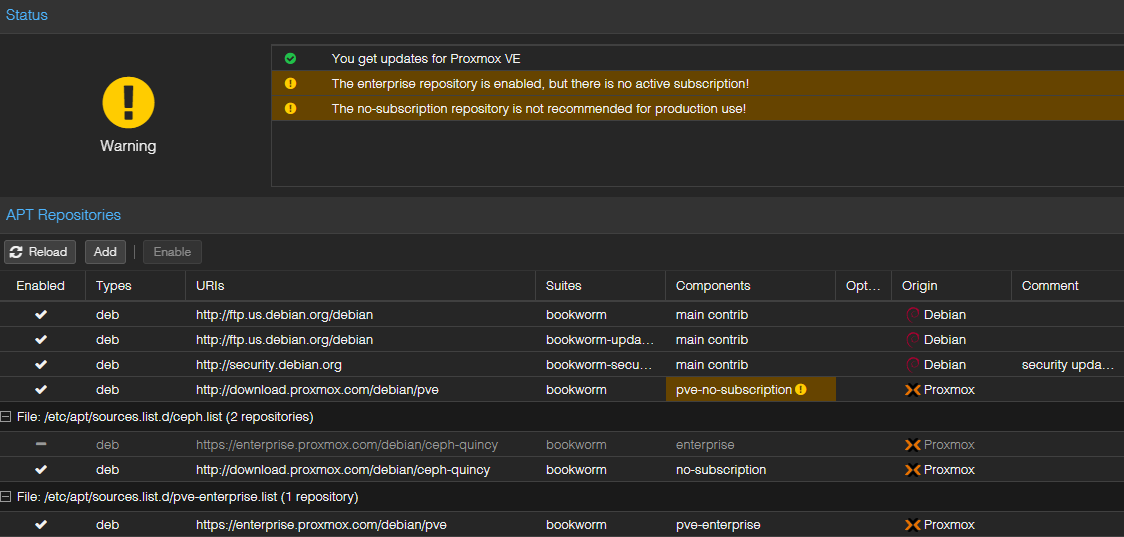
Repositories
Now you can log into proxmox’s UI. https://hostname.your.domainname:8006
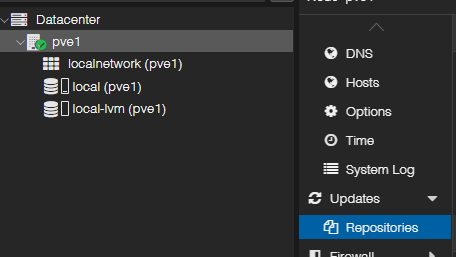
Click on the host, in my case it is pve1 (so not original) and under “Updates”, select “Repositories”
You will want to make a few quick changes:
- Disable “bookwork” “enterprise”
- enable the “bookwork” “pve-no-subscription” repository
Your repositories will look like this:
Now click on “Updates” and click “Upgrade”. Answer “y” to the prompt and let it rip. When complete, reboot the host.
When the system has rebooted, log back in and continue your configuration
Storage
This is the point where you will want to configure your storage. If you have a NAS, you will add the storage by navigating to Datacenter -> Storage. Select “Add”. From the pull down, select “NFS” and complete the form according to your specifications
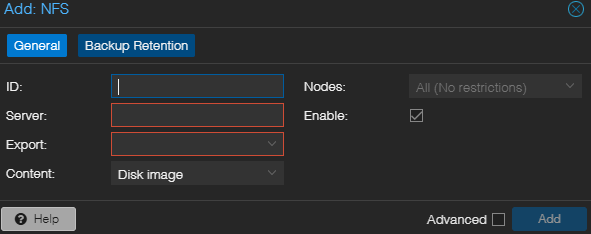
Set up your VM storage as you see fit.
Remove the Nag
ssh on to your new proxmox server and download the following:
https://raw.githubusercontent.com/foundObjects/pve-nag-buster/refs/heads/master/install.sh
run: bash ./install.sh
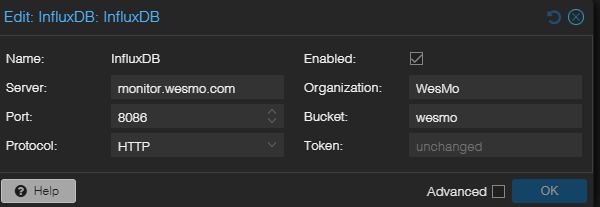
Monitoring
This step is only for those who use Grafana and InfluxDB for monitoring the metrics of the server.
Under Datacenter, select the menu item “Metric Server”
Click “Add” and select “InfluxDB”
Fill out the form according to your specs. Note that you will need to set up an API Token on your influxdb server for this new host.
At this point, you are probably done.